Friday, January 27, 2012

Patterned Gold Ostrich Egg


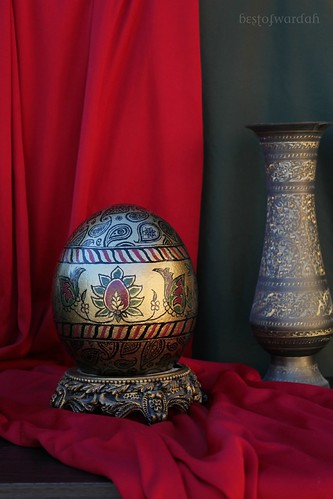
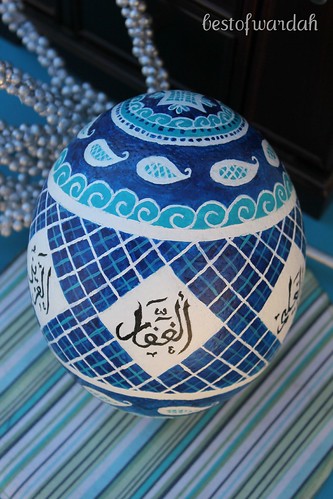
The third ostrich egg I painted was a present for my parents. They recently celebrated their 20th wedding anniversary. My mother requested that I paint her an ostrich egg for our living room. I wasn't able to complete it by their anniversary, but she loved it just as much.


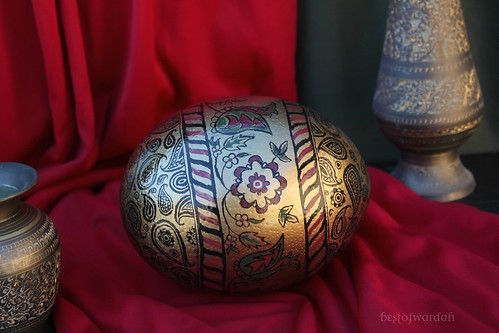
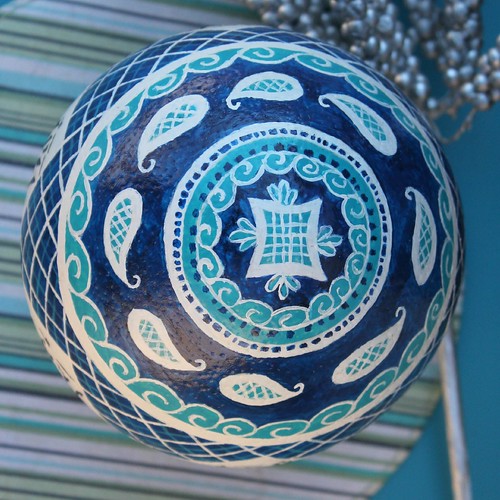
This egg has a very different image from the other two. The metallic gold background gives it a very sophisticated look. This is perfect for where it sits right now: our living room.


The inspiration for the center stripe of the egg came from the carpet in our living room. The border on the carpet is very exquisite, so I figured that incorporating these colors and style onto the egg would help tie it all in together.


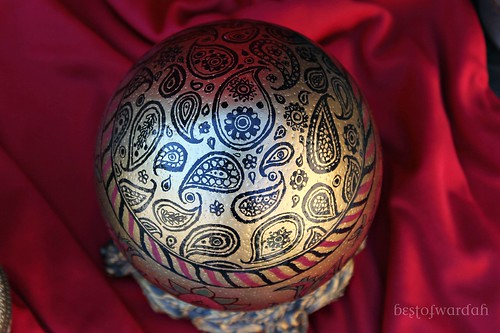
The black patterns on the top and bottom of the egg are done freehand. A lesser-known fact about me is that I am a henna artist. I have been henna-tattooing since I was 8 years old. The designs on this egg came from the many different types of henna tattoos I've done. Similar paisley designs are common in traditional henna art.

On a side note, some of you have been wondering how exactly I start painting an egg. I took a couple of in-process pictures of this egg to show you all how it's done (or at least how I do it).


I start with a clean, hollowed-out ostrich egg. These babies are big: 16"-18" around their length and 14"-15" around their width!
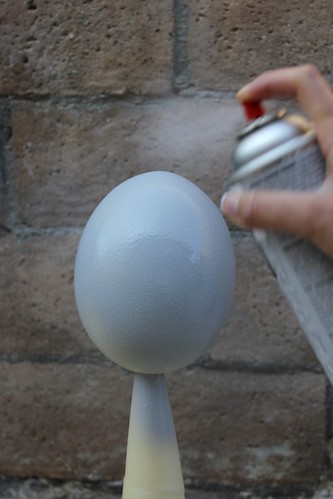
First, I take it outside and spray paint a base coat of gray on it. This allows me to prep the egg and gives me a neutral color to contrast my highlights and shadows to.
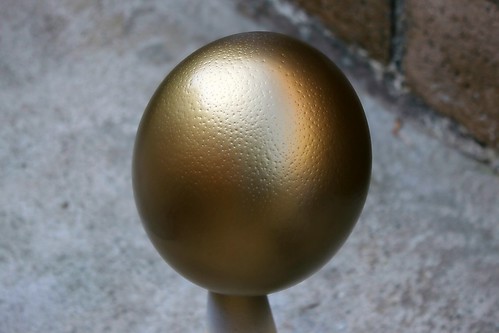
The next step is to paint the egg. In this case, I began by spray-painting this brilliant gold onto the egg. From there, I sketched basic lines to indicate where I would paint the next band. Then, I freehanded the rest of the patterns. Finally, I varnished the egg with a few coats of lacquer to give it a polished look.
As usual, don't forget to email me at warif93@gmail.com if you interested in purchasing an ostrich egg of your own!

Wednesday, January 25, 2012

Blue and White Ostrich Egg


Some of you may have been waiting for another post about the ostrich eggs I have been painting. And justifiably so -- it has taken me quite a while to finally post about them. Well, here it is. I've painted two ostrich eggs since my last post.


This first egg in particular was a commission from a very sweet lady, Apa Lubna. Her mother had an ostrich egg of her own but when her son was visiting, he broke the egg. Of course, her mother didn't hold a grudge against her little grandson. But still, Apa Lubna insisted on replacing the egg. Actually, I think this egg is a surprise.


This egg was based on a pattern Apa Lubna saw on a website. I incorporated the Arabic calligraphy and the paisley designs on the egg of my own accord.


My favorite part of the egg is the view from the top because even though everything looks very rectangular from the sides, it's actually very circularly fashioned.


My cat, Chum Chum, interrupted my photo shoot. It was around then when I started worrying about the egg falling over and cracking...
I finally got him to pose properly. He would not stop looking in the wrong direction! Lesson learned = animals do not make good models.

I hope you all enjoyed this post. Look forward to another ostrich egg coming up very soon. And don't forget, email me at warif93@gmail.com if you are interested in having a painted ostrich egg of your very own (while eggs last).

Thursday, January 19, 2012

Zebra-Inspired cake


This is Mehwish, back with a cool cake technique I tried last week. School may be in session, but it can't take me away from baking :P

Similar to marbling, the technique that I learned requires using two contrasting colors of batter, which are layered into one pan to create... stripes! These "zebra" stripes will awe the cake-consumer, who will question you over and over till you tell them how simple it is to create it.

This post is more about the procedure than the recipe, so choose your favorite white cake recipe and scroll down to be enlightened :)

WHAT YOU WILL NEED:
  1. Cake batter, prepared for one cake and split equally into two bowls
  2. Food coloring or cocoa powder
  3. Cake pan, the appropriate size for your recipe (I used two pans to make two layers of cake, but you can use just one)
  4. Two 1/2 cup measuring cups

STEP 1:
Mix food coloring (or cocoa powder) into one of the bowls of cake batter, making sure you add enough so that the baked cake will be dark. I used black food coloring for this cake. 
Now you should have two bowls of cake batter, one light and one dark.

Prepare your pan by lightly greasing it and placing a cut-out circle of parchment paper in it. This will make it so much easier to get your baked cake out of the pan all in one piece!

STEP 2:
Now, use a separate 1/2 cup measuring cup for each batter to pour the batter into the pan. 
Start with any color. Fill the cup and carefully pour it in the center of the pan. Don't try to spread the batter out or anything. 

Now fill another cup with the second batter and pour that in the center of the pan (right on top of the first cupful of batter).


As you pour, you will notice that the batter in the pan is spreading until it reaches the sides and the pan eventually fills to around halfway up.


Keep pouring, alternating the batters until you have poured all of the cake batter from both bowls into the pan(s). 


Bake the cake at the correct temperature for the recipe you chose.


I torted the slight dome off of my cake layers so that they would be nice and flat when I decorated the cake. The pattern on this layer looks epic. In fact, I think it looks kind of like a peacock tail feather!

Here I placed the first layer on a cake board and spread it with a layer of strawberry glaze.

Then some sliced strawberries...
 

And finally, the whipped cream filling! This scrumptious filling was then covered with the second layer of cake. You can use any filling that you want, of course. 
My parents had just brought home a whole box full of fresh organic strawberries so I sneaked some for my cake ;)


Here is a photo of the ganache I made to cover the cake with. For this, I used semisweet chocolate that I had at home.

Yummyy.


After covering the cake with ganache, I decorated with more strawberries.


And drizzled chocolate over it all...


I found these coffee wafers at my favorite Asian grocery store, so I bought some for cake decoratin' purposes :D
I like how the stripes on the wafers match the inside of the cake.


Andd it's done! 


Those strawberries look nom-worthy, no?


I finally cut the cake! Stripy :D


Not only did this cake look really good, but it tasted amazing too. The wafers were fun to eat and the strawberries were really sweet.


Hope you found this post helpful and enjoyed the pictures! DO try this at home, and share in the comments below if you do!

Sunday, January 15, 2012

Painting the Eiffel Tower


Last year, I painted a wall mural in my brother's room. We, my brother and I, decided to go with a black cityscape against the freshly painted snow blue walls. He gave me full rein as to which buildings to paint, as long as I included the Eiffel Tower. So, I decided to paint real and make-believe buildings that either held importance for the family or were his favorite places.

This corner of this wall is dedicated to the (make believe) "family-owned" businesses, including Farri's Kitchen, Arif Suites, and A.B. Computers. There is also a ferris wheel to complete the French theme.

The far left corner of the wall has some of my brother's favorite places to be including the Hershey's Factory, Costco, and a Ferrari showroom. He asked me to include a bank because his little city was missing one.

Last but not least, the middle of the wall, near the Eiffel Tower, had some more major names our family is accustomed to seeing almost daily; my father's workplace, Paris Baguette, my favorite bakery, and the Black Belt Center. A theater showing Harry Potter and the Deathly Hallows Part 2 was a must because my brother is a big fan of the series.

Practically every time someone first sees this mural, I get these questions.

1) Did you use a black marker to draw that?? Nope, I used black paint and a paint brush.
2) Why is there a plane flying directly towards the tower?! No, no, it's not like that! The paper airplane symbolizes my brother's dream to travel the world, France being one of his planned stops.

I hope you enjoyed this post! Leave a comment below letting me know where in the world you would like to travel to.


P.s. Look forward to a post about gorgeous zebra-inspired cakes soon!

Monday, January 9, 2012

Oreo 'n' Chocolate Wafer Cake


Here are simple instructions on how to make one of the easiest cakes ever. Not only is it put together in a jiffy (with absolutely no baking or cooking involved), but with its high-contrasting stripes of dark wafers and whipped cream, this cake is stunning and it tastes delicious too! But you have to be careful not to eat too much of the Oreo pudding during preparation, or you won't have enough left to frost the cake with!

My little sister Hajerah would like to be credited for making the beautiful cake displayed in these pictures ;)

Alright, on to the recipe!

Oreo 'n' Chocolate Wafer Cake
  1. 1 package Nabisco Famous Chocolate Wafers (9 oz)
  2. 2 cups heavy whipping cream
  3. 2 tbsp sugar, preferably powdered
  4. 1 package instant Oreo pudding mix (4.2 oz)
  5. 2 cups cold milk
STEP 1: Place the bowl and whisk attachment of a stand mixer (such as a Kitchen Aid mixer) in the freezer to cool them for better cream-whipping. After fifteen minutes have passed, remove the torture tools from the freezer and use the mixer to beat the heavy whipping cream and powdered sugar together until stiff peaks have formed.


STEP 2: Spread two teaspoons of the cream on one side of a wafer and stick another wafer on the cream to make a sandwich. Repeat spreading cream and stacking wafers until you have a stack of 12 chocolate wafers, with cream in between them. Lay the stack on its side on a serving tray.


Repeat the process of stacking 12 wafers to make two more stacks and you will have three stacks of wafers lying side-by-side on the tray. There should not be any space between the stacks.

Take the remaining cream, spread it on the leftover wafers, and consume promptly. Consider this a test to find whether your wafer cake will be a success or not.

STEP 3: Prepare the Oreo pudding according to the instructions on the package (basically, whisk the cold milk and the pudding mix together until completely blended). Five minutes later, the pudding should be thick enough for you to pour it over the wafers and spread it evenly over the sides of the wafer stacks with a spatula.


Again, consume the remaining pudding. This is to keep you going for a bit, because the wafer cake must be refrigerated for a couple hours before you can eat it! Refrigeration is necessary to make the chocolate wafers soft and cake-like and to set the Oreo pudding.


This cake can be decorated or garnished however you like. My sister wanted to keep it plain and simple because once the cake is cut, the stripes are eye-catching all on their own! Oh yes, don't forget that you must cut the slices perpendicular to the wafers if you want to see this beautiful display in each slice of this yummy cake :)


Enjoy this super-easy chocolatey cake with a glass of milk or with friends, or both. Your friends will love you for sharing it!

Friday, January 6, 2012

Chocolate Banana Marble Bread


I've been making banana bread for years and years. But I use the same recipe every time, which includes whole wheat flour, dried cranberries, and walnuts. The bread turns out amazingly delicious, but I wanted to try a new recipe for banana bread. This new recipe calls for cake flour instead of whole wheat and the nuts are omitted. What sold me is the addition of cocoa powder to make beautiful chocolate swirls in every slice.


Recipe!

Chocolate-Banana Marble Bread
Ingredients
  • 2 large very ripe bananas
  • 1/4 cup buttermilk, at room temp.
  • 2 teaspoons pure vanilla extract
  • 2 cups sifted cake flour
  • 1 teaspoon baking soda
  • 3/4 teaspoon baking powder
  • 1/4 cup cocoa powder
  • 3 tablespoons boiling water
  • 1 1/2 sticks unsalted butter, softened
  • 1 cup sugar
  • 2 large eggs, at room temp., lightly beaten
STEP 1: Preheat oven to 350°F. Lightly coat a 9 by 5-inch loaf pan with melted butter and line it with parchment paper that extends 1 inch beyond the long edge of both sides of the pan.

STEP 2: Mash bananas and whisk in the buttermilk and vanilla until just blended, set aside. Sift the flour, baking soda, and baking powder together into a medium bowl. Whisk to blend well, then set aside.

Place cocoa powder in a small bowl. Add the boiling water and mix thoroughly until the mixture falls off a spoon in a thick glob. Set aside.

STEP 3: Place the butter and sugar in the bowl of a mixer stand and beat until blended. Add the egg mixture, one teaspoon at a time, waiting for the egg to be completely mixed in before adding in the next spoonful.

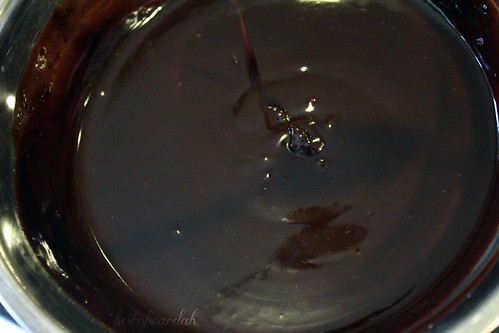
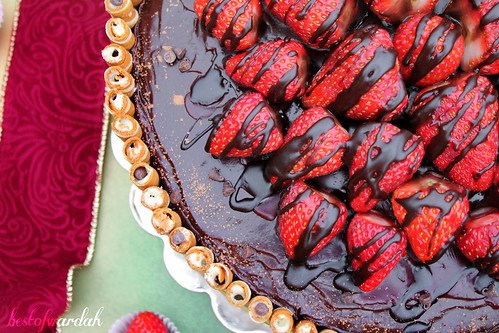
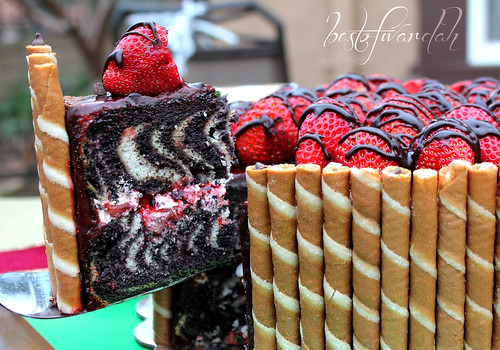
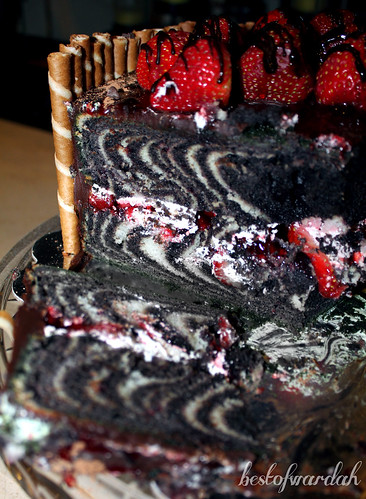
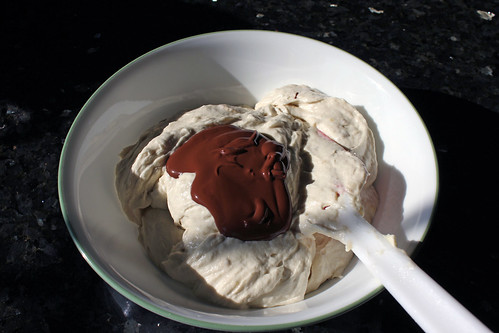
STEP 4: Separate half of the batter into a medium bowl. Add the cocoa mixture and gently blend until mixed.
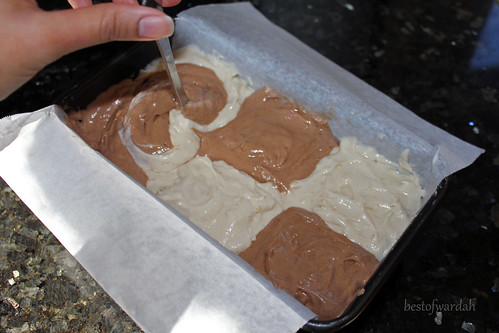
 
STEP 5: Drop alternating spoonfuls of dark and light batters into the prepared pan.


Then marbleize by using a spoon to turn the batter over in three place down the length of the pan.


STEP 6: Bake the banana bread for 55 to 65 minutes, until firm to the touch and a toothpick inserted into the center of the loaf comes out clean.


Transfer to a rack to cool completely. When cool, remove from pan, peel off the parchment paper, and cut slices by sawing gently with a serrated knife.


Enjoy!

Mehwish


© Best of Wardah. Made with love by The Dutch Lady Designs.